How to Increase Your Shopify Conversion Rate: Highest-ROI Fixes First
Last updated: · Shopify features, pricing, and platform policies change. Verify with official sources before acting.
Conversion rate optimization is where one-person stores waste the most effort on the least impact. The temptation is to tweak the theme — button colors, hero animations, a new font — because it feels like progress. Meanwhile the fixes that actually move conversion sit untouched, because they’re less fun: an unclear product page, hidden shipping cost, no cart recovery.
This guide is a priority list. It ranks the conversion fixes by return on the limited time a one-person store has, so you work top-down instead of chasing whatever is easiest. The rule is simple: fix the highest-leverage friction first, and don’t touch the theme until the fundamentals are done.
These priorities are planning defaults for a $5,000–$50,000 MRR solo store; validate them against your own analytics before committing time.
Quick answer
- Start with the product page, not the theme. Clarity — what it is, why it’s worth it, the objection answered — moves conversion more than any design tweak.
- Remove cost and policy friction next. Surprise shipping cost at checkout and a hard-to-find return policy kill carts. Make both clear and early.
- Add trust where the decision happens. Reviews, clear contact, and secure-checkout signals reduce the risk a new visitor feels.
- Recover what you lose. Abandoned cart recovery and email capture turn near-misses into sales — cheaper than winning new traffic.
- Only then optimize the theme, and only with data. Below meaningful traffic, A/B tests are noise; fix the fundamentals first.
Who this is for
This is for a solo store owner on Shopify, $5,000–$50,000 MRR, who wants more revenue from existing traffic without a big time budget. If your traffic is very low, the priority is still the same — fundamentals first — but hold off on split-testing until you have enough visitors to read a result. If you have strong traffic and solid fundamentals, the lower items on this list become worth the time.
Why solo CRO is a prioritization problem
For a store with a team, conversion optimization is a testing program. For a seller running everything alone, it’s a triage decision: with a few hours, which fix returns the most? The failure mode is spending those hours on visible-but-low-impact theme changes while high-impact friction goes unaddressed. The answer is to work the list in order of return, not in order of ease or visibility.
Find your leak before you pick a fix
The list below is ordered by average return. Your own store isn’t average, and Shopify already knows where you’re losing people.
Shopify’s conversion reports include a Conversion rate breakdown that splits your traffic into four steps: all sessions, sessions with cart additions, sessions that reached checkout, and sessions that completed checkout. Shopify defines the conversion rate itself as the percentage of sessions that resulted in a purchase, and each step as the sessions for that step divided by total sessions.
Open that report for the last 30 days and look for the biggest single drop between two steps. That drop names the level you should work on first.
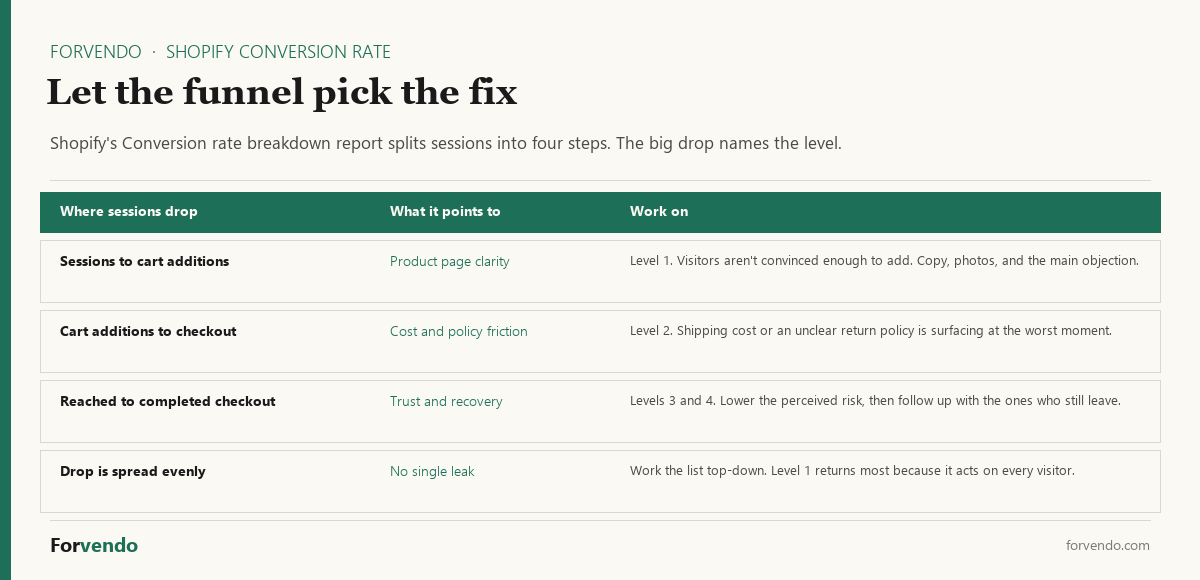
If most visitors leave without adding to cart, checkout tuning has little left to fix. That’s a product page problem, and it happens to be level 1 anyway. If people add to cart in healthy numbers and then vanish before checkout, the leak is cost and policy friction, and you can skip ahead to level 2 with a clear conscience. If the drop is spread evenly across all four steps, there’s no single leak to chase, and working the list top-down is the right call.
One caution: at low traffic these percentages jump around. A store with 200 sessions a week doesn’t have a stable funnel; it has a small sample. Read the 30-day view rather than the weekly one, and treat a difference of a point or two between steps as noise.
The priority list
Work top to bottom. Each level returns more per hour than the one below it for most solo stores.
1 — Product page clarity. Most lost conversions are decisions the visitor couldn’t make because the page didn’t answer “what is this, why is it worth it, and what about my concern?” Lead with a clear value statement, real photos, and the top objection handled in the copy. This is the highest-return fix because it works on every visitor to the page.
Free download
The Solo Shopify Weekly Operating Checklist
A one-page PDF plus a copyable Google Sheet — the weekly cadence these guides build on. Free; bring your own store data.
Get the free checklist →2 — Cost and policy friction. A shipping cost that only appears at checkout is one of the most common cart-killers. Show shipping clearly, ideally with a margin-first shipping model and a threshold, and make your returns and exchanges policy easy to find. Removing surprises at the decision point recovers carts you were losing silently.
3 — Trust signals. A new visitor is weighing risk. Reviews, a real contact path, and clear secure-checkout cues reduce it. For a brand nobody knows yet, trust is often the difference between “maybe” and “buy.”
4 — Recovery. After the on-page fundamentals, catch what still slips: turn on abandoned cart recovery and match one email capture method to your traffic. Recovered revenue is cheaper than newly acquired revenue.
5 — Theme and testing, last. Only after 1–4 are solid does layout tuning pay off, and only with enough traffic to read an A/B result. Below meaningful volume, a test tells you nothing and the time is better spent on the higher items.
Forvendo decision rule
Work the conversion list top-down by return on time — product-page clarity, then cost/policy friction, then trust, then recovery — and leave theme tweaks and A/B tests for last. Do not split-test below the traffic needed to read a result; fix the fundamentals that work on every visitor first.
Do not touch the theme yet if your product pages are unclear, shipping cost surprises at checkout, or you have no cart recovery. Those return more than any design change.
The level 1 product page checklist
Level 1 gets the most words here because it returns the most and because “make the page clearer” isn’t an instruction anyone can act on. A product page has five jobs. Each one answers a question the visitor is already asking.
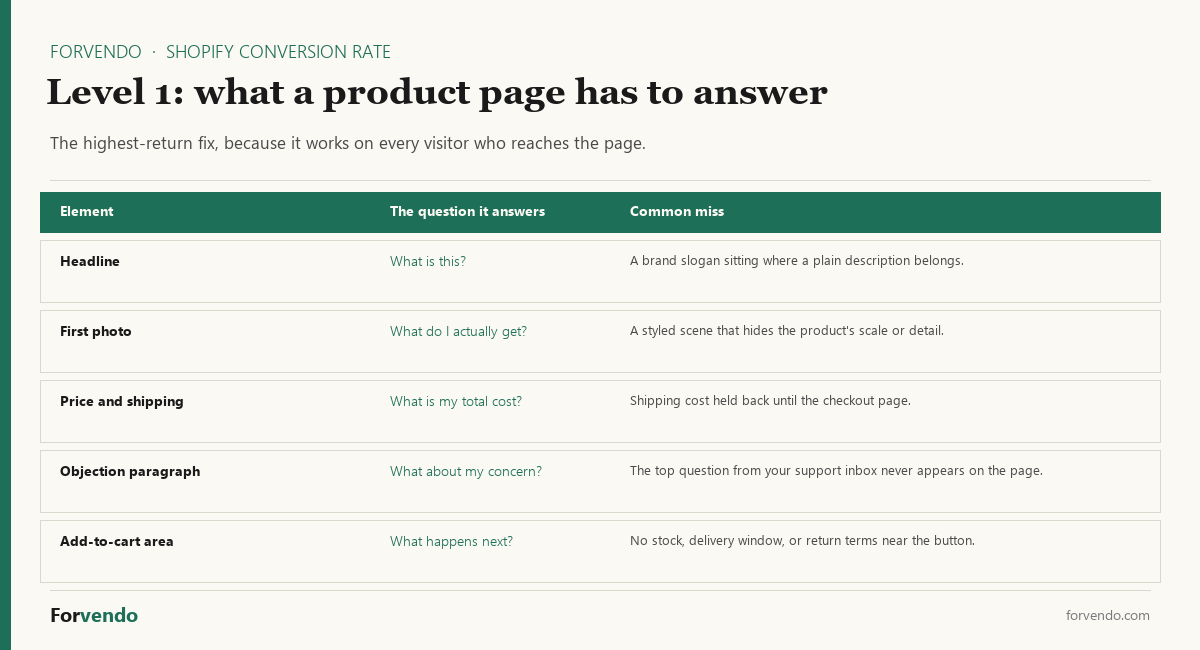
The headline says what the thing is. Brand slogans belong on the homepage. A visitor who landed from search needs a plain description in the first line, and the brand voice can live in the paragraph underneath.
The first photo shows what arrives. Styled lifestyle shots sell a mood, but they often hide scale, texture, and what’s actually in the box. Lead with the product on a plain background, then use the styled shots after it.
Price and shipping appear together. Shipping cost that only shows up at checkout is the single most common silent cart-killer, and it’s the reason level 2 sits so high on this list. If you use a free-shipping threshold, say so on the product page, not just at the cart.
One paragraph handles the top objection. You already know what it is. It’s the question that shows up most in your support inbox. Put the answer on the page, in your own words, near the buy button — every visitor who wondered the same thing and didn’t email you is a sale you didn’t see.
Forvendo newsletter
Operating notes, once a week
One email a week for US-based solo Shopify operators at $5,000–$50,000 MRR: a decision, a checklist, or a teardown. No fluff, unsubscribe anytime.
Join the newsletter →The add-to-cart area answers “what happens next.” Stock status, a delivery window, and a one-line return summary next to the button remove the last three reasons to hesitate. Linking the full returns and exchanges policy from there is enough; the summary does the work.
Time-box this. One product page, 45 minutes, your best-selling SKU first. Then apply what you learned to the next two pages rather than rewriting the whole catalog in one sitting.
The one metric to watch
Track conversion rate over time, not day to day. A solo store’s daily rate swings on small numbers, so a single good or bad day means little. Look at the trend across weeks as you work down the list, and tie each change to a specific fix so you learn what moved it. Shopify’s built-in store analytics give you the conversion and behavior reports to do this without another tool.
How much traffic a test actually needs
This guide says “wait until you have enough traffic” four times, so here’s what that means in numbers.
A split test compares two versions and asks whether the difference is real or noise. The smaller the effect you’re trying to detect and the lower your conversion rate, the more visitors each version needs before the answer stops being a coin flip. For a store converting in the low single digits, detecting a modest lift takes thousands of sessions per version — which is why most stores below $50,000 MRR can’t finish a meaningful test inside a month.
Run the check on your own numbers. Find your weekly sessions in Shopify analytics, halve it (each version only sees half the traffic), and ask how many weeks it would take to reach the sample size a free sample-size calculator asks for at your current conversion rate. If the answer is more than about four weeks, the test will be stale before it’s significant — your traffic mix, season, and product lineup will all have moved.
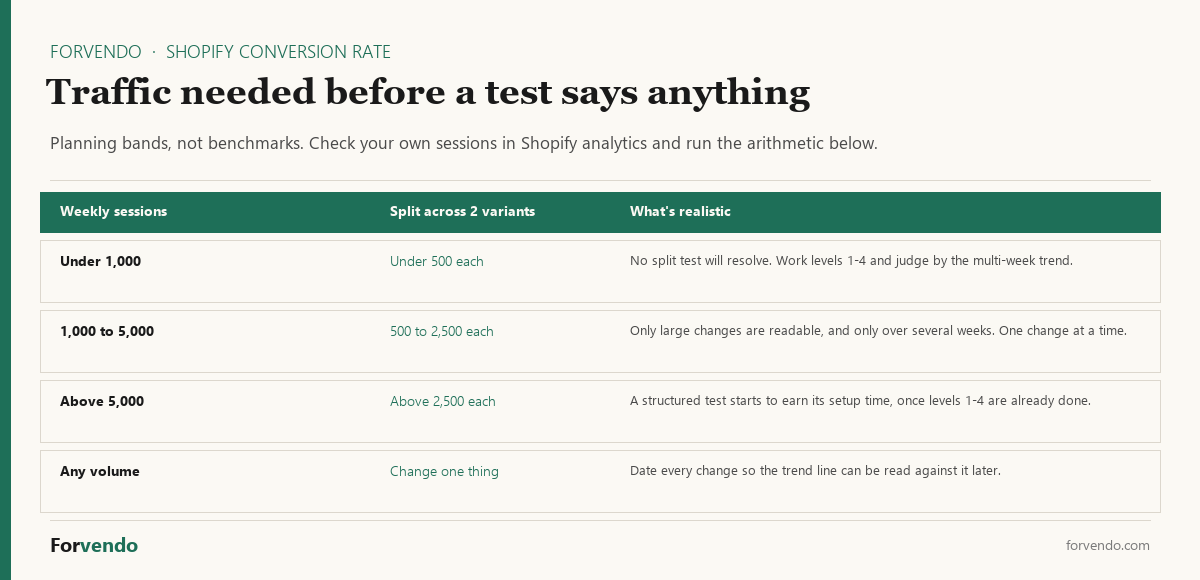
Those bands are planning defaults, not benchmarks — they depend on your baseline rate and the size of the change you’re testing. Check them against your own analytics before you commit time to a test.
The practical alternative below testing volume is sequential change with dated notes. Make one change, write down the date, and watch the conversion rate trend over the following three to four weeks against the same period before. It’s weaker evidence than a controlled test, and it’s honest to say so: seasonality and traffic-source shifts can move the number on their own. But it’s the best read available at solo-store volume, and it beats changing five things and guessing which one worked.
Your first 90 minutes
If you only have one working session, spend it like this rather than reading further.
- 10 minutes — find the leak. Open the Conversion rate breakdown for the last 30 days and note the biggest drop between two steps.
- 45 minutes — fix one product page. Take your best-selling SKU and run the five checks above on it. Rewrite the headline, move the plain-background photo first, put shipping cost on the page, and add the objection paragraph.
- 20 minutes — remove one cost surprise. Confirm your shipping model shows its cost before checkout, and that the return policy is reachable from the product page in one click.
- 15 minutes — write it down. Log today’s date and what you changed, so the trend line means something in three weeks.
That’s the whole loop: diagnose, fix the highest-return thing, remove one surprise, and date it. Repeat it weekly and you’ll have worked through levels 1 and 2 within a month, which is where nearly all of the available lift sits for a store this size.
Common mistakes
- Starting with the theme. Visible, low-impact, and the most common time sink. It comes last.
- A/B testing at low traffic. Without volume, tests are noise. Fix fundamentals first.
- Hiding shipping cost until checkout. One of the biggest silent cart-killers.
- No recovery. Losing near-buyers with no follow-up leaves the cheapest revenue on the table.
- Reading the funnel at weekly volume. At a few hundred sessions a week the step-by-step percentages swing on their own. Use the 30-day view to decide where the leak is.
- Changing five things at once. Then you can’t tell what worked. Change one, watch the trend.
What this article does not cover
This is a priority framework for on-store conversion, not a paid-traffic or ad-creative guide, and not a deep dive on any single fix (each links to its own guide). It doesn’t cover pricing strategy beyond friction, or checkout customization requiring Shopify Plus.
Related Forvendo guides
Each level of the list has its own deep-dive: shipping rates, returns and exchanges, abandoned cart recovery, and email capture. Pricing friction connects to discount strategy, and the whole system sits inside the Solo Shopify Operations guide.
Frequently asked questions
Where do I find my conversion rate in Shopify?
In Shopify’s analytics, under the behaviour reports. The Conversion rate breakdown report shows the four steps — all sessions, sessions with cart additions, sessions that reached checkout, and sessions that completed checkout — and Conversion rate over time shows the trend. Shopify defines the rate as the percentage of sessions that resulted in a purchase, so it counts sessions rather than people; one visitor returning twice counts twice.
My conversion rate dropped suddenly. What should I check first?
Check whether the drop is in one funnel step or spread across all of them. A drop concentrated at one step points to something you changed near it — a new shipping rate, a theme update, an out-of-stock bestseller. A drop spread evenly usually means your traffic mix changed rather than your store: a new source, a campaign, or seasonal browsers converting at a lower rate than your usual visitors. Compare the same 30-day window against the prior one before changing anything.
What is a good conversion rate for a small Shopify store?
It varies widely by product, price, and traffic source, so the useful comparison is your own store over time, not a benchmark. Track the trend across weeks as you work the priority list; a rising rate tied to specific fixes matters more than hitting a generic number.
What should I optimize first to improve conversions?
The product page. Clarity — what it is, who it’s for, and the main objection answered — moves conversion more than any design change because it works on every visitor. Cost and policy friction (shipping, returns) come next, then trust signals, then recovery, then the theme.
How long should I wait before deciding a change worked?
Give it three to four weeks and compare against the same length of time before the change. A solo store’s daily conversion rate swings on small numbers, so a good week right after a change proves nothing on its own. Two things make the comparison more honest: change one thing at a time, and check whether your traffic sources stayed roughly the same across both periods. If a campaign or a new referrer arrived mid-window, the traffic mix moved and the comparison is not clean.
Should I A/B test my Shopify store?
Only once you have enough traffic to read a result and the fundamentals are already solid. Below meaningful volume, a split test can’t reach significance and the time is better spent on product pages, friction, and recovery, which return on every visitor regardless of traffic.
Do I need a CRO app for Shopify?
Usually not first. The highest-ROI fixes — page clarity, shipping transparency, trust, recovery — use native tools and your own copy. A dedicated testing or optimization app earns its place only once you have the traffic to test and the fundamentals are done, and it’s a cost decision worth checking first.
How does shipping affect my conversion rate?
Heavily. A shipping cost that appears only at checkout is a leading cause of abandonment. Showing shipping clearly and using a threshold model reduces the surprise at the decision point, which recovers carts you were losing without seeing why.
Forvendo Editorial note. Forvendo publishes educational operating resources for solo ecommerce operators. Articles may cover tax, sales tax, 1099-K reporting, software pricing, platform policies, and other operating topics that change over time.
This content is for general research and operational planning. It is not legal, tax, accounting, financial, or professional advice. Readers should verify details with official sources or qualified professionals before acting on them. Platform rules, tax thresholds, software pricing, and affiliate program terms can change without notice.
Forvendo articles may be drafted with AI assistance and are reviewed by the operator before publication according to our Editorial Policy, which covers sourcing, AI use, update cadence, and corrections. See also About, Disclosure, and Privacy Policy.